How to Run Large Language Models Locally: Ollama, Llama 3, and PrivateGPT Setup
Introduction to Running LLMs Locally
Imagine having the power of a world-class AI assistant directly on your machine, completely under your control. While cloud-based models are incredibly capable, they come with hidden costs, internet dependencies, and critical privacy risks.
Learning how to run llm locally ollama-style changes the game entirely. By transitioning to a local, offline LLM setup, you unlock three massive advantages:
- Absolute Data Privacy: Your sensitive files and prompts stay on your hardware, completely safe from third-party servers.
- Zero API Fees: Say goodbye to monthly subscriptions and unpredictable pay-per-token billing.
- No Internet Required: Run your workflows seamlessly, even when you are completely disconnected from the grid.
To achieve this, we will leverage a powerhouse trifecta. We’ll use Ollama for effortless model management, Meta’s cutting-edge Llama 3 for brainpower, and PrivateGPT to build a secure, chat-based interface over your personal documents.
Prerequisites and System Requirements
Before diving into your llama 3 local setup, you need to make sure your machine has the muscle to handle it. Running these models locally is resource-intensive, but you don’t need a supercomputer to get started.
Here is the baseline hardware you will need to run Ollama, Llama 3 (8B), and PrivateGPT smoothly:
- Operating System: macOS (Apple Silicon M1/M2/M3 preferred), Windows 10/11, or Linux.
- Memory (RAM): 16 GB is the absolute minimum, but 32 GB is the sweet spot for seamless multitasking.
- Graphics (VRAM): A dedicated GPU with at least 8 GB VRAM (like an NVIDIA RTX 3060 or Apple Unified Memory) ensures fast, real-time responses.
- Storage: At least 10 GB of free SSD space to store the model weights and installation dependencies.
If your rig meets these specifications, you are fully equipped to build your private AI powerhouse.
Step 1: Installing Ollama and Downloading Llama 3
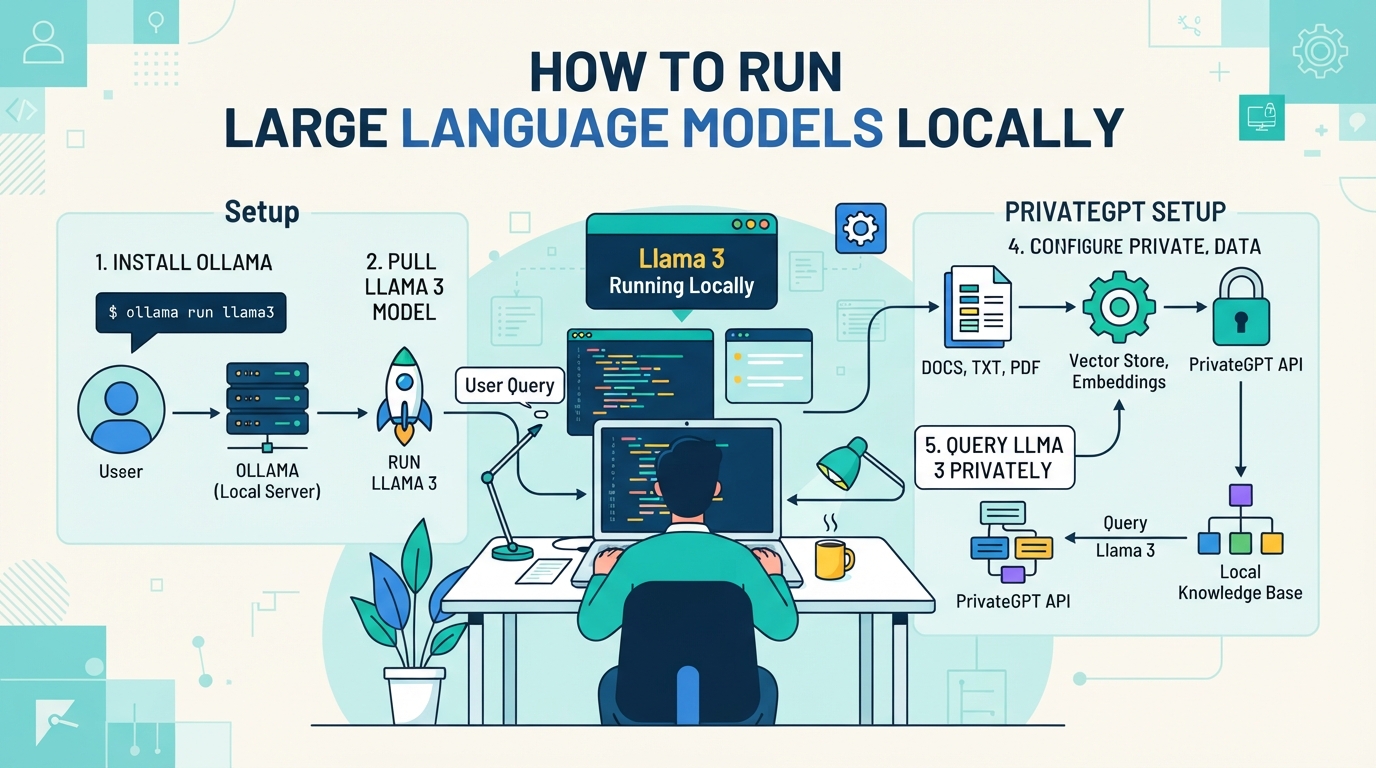
With your hardware ready, the first step to run llm locally ollama style is installing the core engine. Think of Ollama as a lightweight, user-friendly manager that handles your model downloads and execution in the background.
Here is how to get it onto your machine:
1. macOS & Windows: Download the installer directly from the official Ollama website and run the setup wizard.
2. Linux: Open your terminal and run this quick installation script:
curl -fsSL https://ollama.com/install.sh | sh
Once installed, the Ollama service will run quietly in your system tray.
Now, let’s complete your llama 3 local setup. Open your terminal (macOS/Linux) or Command Prompt (Windows) and execute this single command:
ollama run llama3
This command instantly fetches Meta’s Llama 3 model from the Ollama registry and launches an interactive chat session directly in your command line. Type a prompt, hit enter, and watch your local AI respond in real-time.
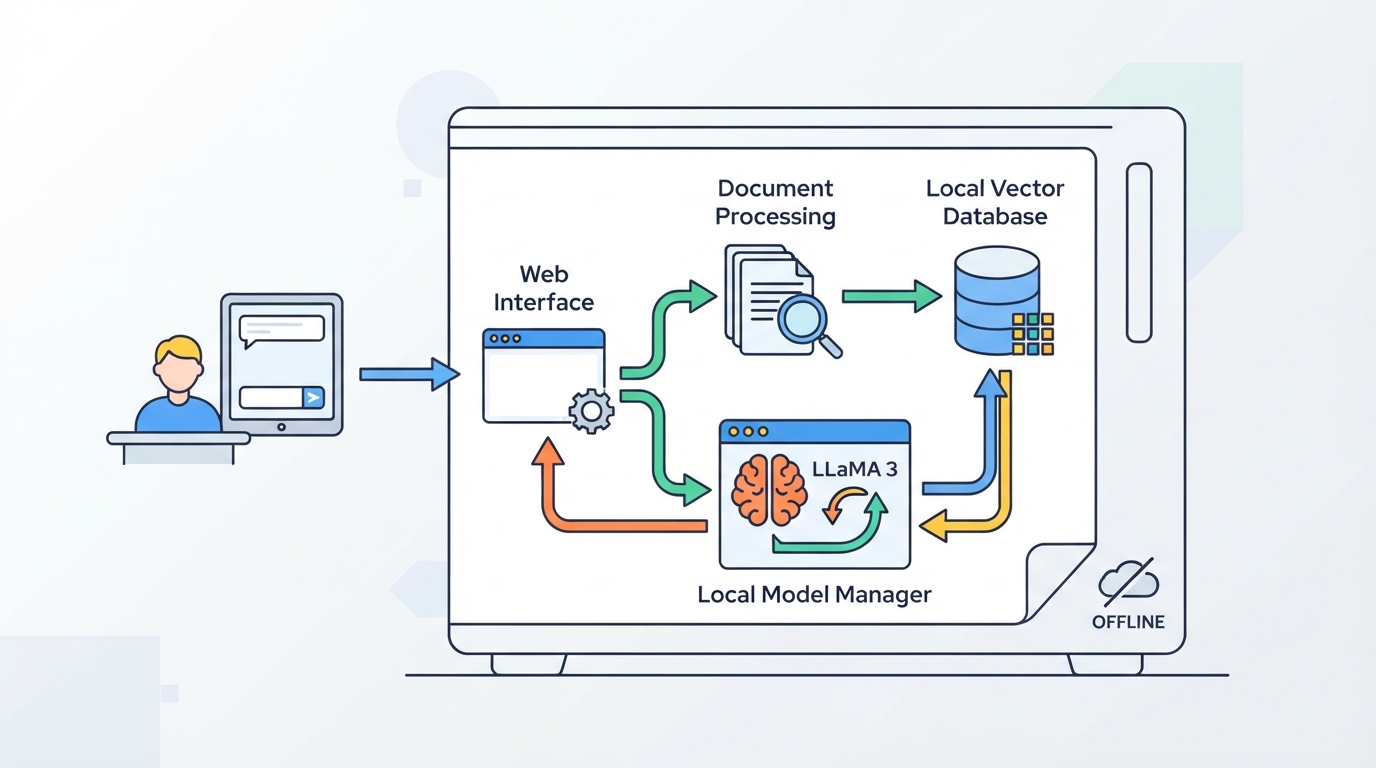
Step 2: Cloning and Setting Up PrivateGPT
With Llama 3 humming in the background, it’s time to build your private interface. PrivateGPT acts as the secure bridge between your local documents and your AI model.
First, open your terminal to clone the official repository and jump straight into the project directory:
git clone https://github.com/zylon-ai/private-gpt
cd private-gpt
To keep your system clean, this privategpt ollama guide relies on Poetry for dependency management. If you need to install Poetry first, run pip install poetry.
Now, initialize the environment and install the required UI and local settings with these two commands:
poetry config virtualenvs.in-project true
poetry install --with ui,local
This setup ensures all required Python packages are isolated, preparing your machine for secure, fully offline document analysis.
Step 3: Configuring PrivateGPT for Ollama Integration
With your environment ready, it’s time to link PrivateGPT to your local Ollama engine to power your local RAG pipeline.
To do this, we will modify the ollama settings-ollama.yaml configuration file located in the project root. This file tells PrivateGPT exactly how to communicate with your locally running models.
Open the file in your text editor and update the following key blocks to target your local API endpoint:
- LLM Block: Set
mode: ollamaand point theapi_basetohttp://localhost:11434. - Embedding Block: Set
mode: ollamaand also point itsapi_basetohttp://localhost:11434.
llm:
mode: ollama
api_base: http://localhost:11434
embedding:
mode: ollama
api_base: http://localhost:11434
By routing both the LLM generation and embedding layers through port 11434, your documents stay 100% private and process entirely offline.
Step 4: Launching the Local UI and Querying Your Documents
With your configuration locked in, it’s time to fire up your fully offline LLM setup. Open your terminal in the PrivateGPT directory and run the following command to launch the application with your Ollama profile:
PGPT_PROFILES=ollama make run
Once the server initializes, open your browser and navigate to http://localhost:8001 to access the clean PrivateGPT web interface.
Here is how to put your new local RAG pipeline to work:
- Upload Documents: Drag and drop your private PDFs, TXT, or CSV files into the ingest area. PrivateGPT will automatically chunk and embed them locally.
- Select Query Mode: Toggle the chat mode to “Query Files” so Llama 3 only references your uploaded documents.
- Ask Questions: Type your prompt into the chat box.
Llama 3 will instantly analyze your files and generate precise answers. Your data never leaves your machine, keeping your sensitive information completely secure.
Troubleshooting Common Setup Issues
Even the smoothest local AI setups can hit a few speed bumps. If you run into roadblocks, here is how to resolve the most common issues quickly:
- Port 11434 Conflicts: If Ollama fails to start, another instance is likely hogging the default port. On Mac/Linux, run
lsof -i :11434and kill the process usingkill -9. On Windows, simply close the Ollama app from your system tray and restart it. - Poetry Environment Mismatches: Getting dependency errors during PrivateGPT setup? Ensure you are using Python 3.11. Run
poetry env use python3.11followed bypoetry installto rebuild your environment cleanly. - Slow Generation Speeds: If Llama 3 is lagging, check your ollama settings-ollama.yaml configuration file to verify your API host and model parameters are mapped correctly.
To maximize performance, always close RAM-heavy background applications like Chrome. This frees up crucial VRAM, allowing your GPU to handle the model’s heavy lifting at lightning speed.
Conclusion
By pairing Ollama’s streamlined engine with PrivateGPT’s robust document ingestion, you have successfully built a fully offline AI powerhouse. You no longer need to rely on third-party cloud APIs or worry about your sensitive data training external models.
Now that you can run llm locally ollama empowers you to reclaim your data sovereignty through three key pillars:
- Absolute Privacy: Your documents, prompts, and code never leave your local machine.
- Zero API Fees: Enjoy predictable performance without subscription costs or rate limits.
- Unmatched Customization: Swap models like Llama 3 instantly to fit your specific workflow.
Taking control of your AI stack is more than just a performance upgrade—it is a commitment to data security. With this local setup, you now have the tools to build secure, private, and incredibly fast applications on your own terms.